
In this article, we will learn as how to implement conditional rendering in LWC. Conditional rendering is a technique in UI development that allows us to show or hide elements based on specific conditions. In Lightning Web Components (LWC), we can implement conditional rendering using the template if:true and template if:false directives.
The basic syntax of the template if:true directive is as follows:
<template if:true={condition}>

    <!-- content to be rendered if condition is true -->

</template>
Here, the content inside the template tag will only be rendered if the condition is true. If the condition is false, the content inside the template tag will not be rendered.
For example, consider the following code snippet:
<template>

    <template if:true={showMessage}>

        <p>Welcome to sfdc4u.com</p>

    </template>

</template>
In this example, the <p> tag will only be rendered if the showMessage property is set to true. If the showMessage property is set to false, the <p> tag will not be rendered.
The value of the showMessage property can be set in the JavaScript class of the Lightning Web Component.
/*
* @description: conditional rendering in lwc component
* @author: sfdc4u.com
*/

import { LightningElement } from 'lwc';

export default class MyComponent extends LightningElement {

    showMessage = false;

    toggleMessageVisibility() {

        this.showMessage = !this.showMessage;

    }

}
Here’s a complete code example to implement conditional rendering in Lightning Web Components (LWC):
helloWorld.html:
 <template>

    <template if:true={showMessage}>

        <p >Hello World</p>

    </template>

    <template if:false={showMessage}>

        <p>Goodbye World</p>

    </template>

    <lightning-button label="Toggle Message" onclick={toggleMessageVisibility}></lightning-button>

</template>
HelloWorld.js
import { LightningElement } from 'lwc';

export default class HelloWorld extends LightningElement {

    showMessage = false;

    toggleMessageVisibility() {

        this.showMessage = !this.showMessage;

    }

}
In this example, the showMessage property is used to control whether the “Hello World” or “Goodbye World” message is displayd. The toggleMessageVisibility method is used to toggle the value of the showMessage property between true and false. A button is also includd to allow the user to toggle the message.
If the value of the showMessage property is true, the first template if:true directive will render the “Hello World” message. If the value of the showMessage property is false, the second templete if:false directive will render the “Goodbye World” message.
Let’s consider an another example where we display the field text based based on toggle button.
Here’s a code example of how we can use conditional rendering in Lightning Web Components (LWC) to display text based on condition:
renderingInLwc.html
<template>
    <lightning-button label="Toggle Car Status" onclick={toggleCarStatus}></lightning-button><br/><br/>

    <template if:true={isRunning}>
        <lightning-card title="Running Car" icon-name="custom:custom19">
            <p>The car is running</p>
        </lightning-card>
    </template>

    <template if:false={isRunning}>
        <lightning-card title="Stopped Car" icon-name="custom:custom19">
            <p>The car is stopped</p>
        </lightning-card>
    </template>

</template>
/*
* @description: conditional rendering in lwc component
* @author: sfdc4u.com
*/
import { LightningElement } from 'lwc';

export default class RenderingInLwc extends LightningElement {
    isRunning = false;

    toggleCarStatus() {
        this.isRunning = !this.isRunning;
    }

}
renderingInLwc.js-meta.xml
<?xml version="1.0"?>
 <LightningComponentBundle xmlns="http://soap.sforce.com/2006/04/metadata">
    <apiVersion>55.0</apiVersion>
    <isExposed>true</isExposed>
    <targets>
        <target>lightning__AppPage</target>
        <target>lightning__RecordPage</target>
        <target>lightning__HomePage</target>
        <target>lightning__Tab</target>
    </targets>
 </LightningComponentBundle>
Now let’s add this LWC component on the home page.
- Go to Home page
- Click Setup (Gear Icon) and select Edit Page.
- Under Custom Components, find your renderingInLwc component and drag it on right-hand side top.
- Click Save and activate.
Output:

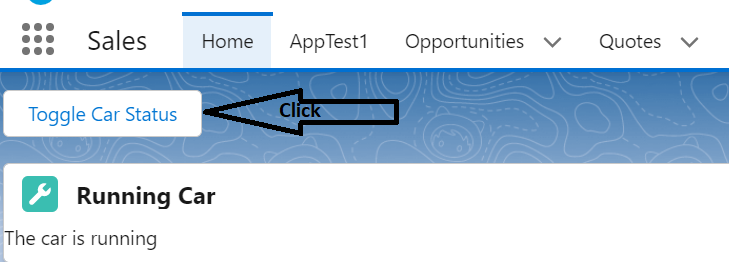
In this example, the isRunning property is used to control whether the car is running or stopped. The toggleCarStatus method is used to toggle the value of the isRunning property between true and false. A button is also included to allow the user to toggle the car status.
If the value of the isRunning property is true, the first template if:true directive will render the “The car is running” message. If the value of the isRunning property is false, the second template if:false directive will render the “The car is stopped” message.
Reference: Salesforce
Also Read : LWC Tutorial
1 thought on “Implement Conditional Rendering in LWC”