In this article, we will learn about events in Lightning Web Component. Events is nothing but the way component is going to communicate with the other components.
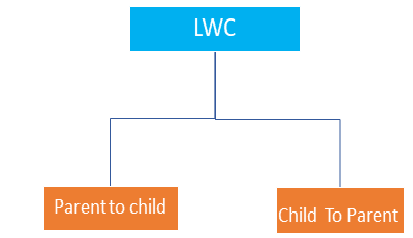
There are typically 3 approaches for communication between the components using events.
- Parent to Child Event communication
- Child to Parent Custom Event Communication
- Publish Subscriber model (When two components doesn’t have a direct relation)
-
Parent to Child Event communication
In LWC we can pass the message from parent to child using below two ways:
- Public Method
- Public properties.
We have to use the @api decorator to make the children properties / method available to parent component.
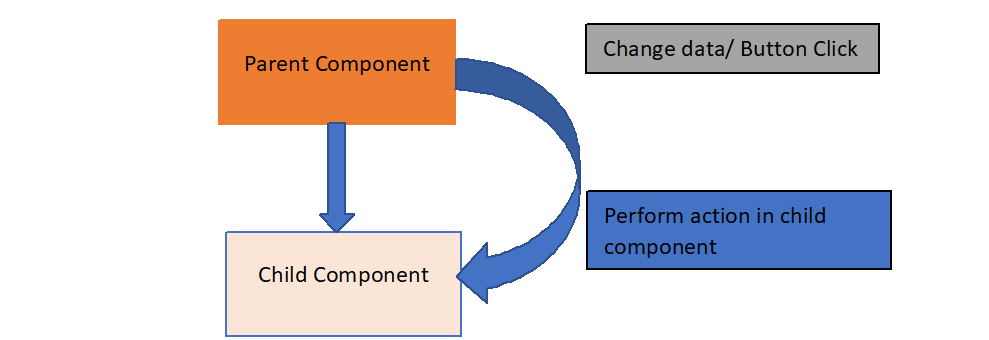
Let’s consider an example to pass value from parent component to child component with steps involved:
Step 1> Create one child Component to show message from parent component
childComponent.html
<template>

    Message from the Parent Component :- {message}

</template>
Step 2) Create javaScript method in child component to assign value on child attribute
childComponent.js
/*

* @description: child component

* @author: sfdc4u.com

*/

import { LightningElement, track, api } from 'lwc';

export default class ChildComponent extends LightningElement {

    @track message;

    @api

    sendMessage(msgString) {

         this.message = msgString;

    }

}
Step 3) Create one Parent Component to call child component
ParentComponent.html
<template>

    <lightning-card title="Parent to Child Component Demo">

        <lightning-layout>

            <lightning-layout-item flexibility="auto" padding="around-small">

                <lightning input label="Please Enter the Message:" onchange={handleChangeEvent}></lightning-input>

            </lightning-layout-item>


            <lightning-layout-item flexibility="auto" padding="around-small">

                <c-child-Component></c-child-Component>

            </lightning-layout-item>


        </lightning-layout>

    </lightning-card>

</template>
Step 4) Create JavsScript method in Parent component to call child method with “this.template.querySelector”.
ParentComponent.js
 /*

* @description: parent component

* @author: sfdc4u.com

*/

import { LightningElement } from 'lwc';

export default class ParentComponent extends LightningElement {

    handleChangeEvent(event){

        this.template.querySelector('c-child-Component').sendMessage(event.target.value);

    }

}
Step 5) Update your meta.js file to make this component available for App, home page.
 <?xml version="1.0"?>

<LightningComponentBundle xmlns="http://soap.sforce.com/2006/04/metadata">

    <apiVersion>55.0</apiVersion>

    <isExposed>true</isExposed>

    <targets>

        <target>lightning__RecordPage</target>

        <target>lightning__AppPage</target>

        <target>lightning__HomePage</target>

    </targets>

</LightningComponentBundle>
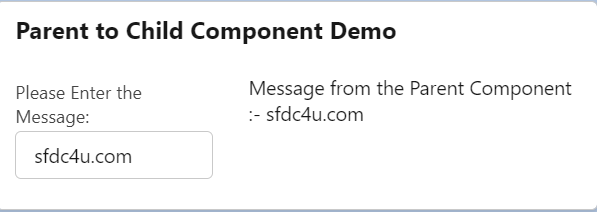
Output:
-
Child to Parent Custom Event Communication
In case of Child to Parent communication, custom event is used where we can create, dispatch, and handle the event. Let’s see each one of them in detail:
Create event: We can use the customEvent() constructor to create an event. In constructor we need to pass custom event name and detail of the event.
new customEvent(eventName, props);
Dispatch event: Then, we can make an event target dispatch the created event invoking the dispatchEvent standard method.
this.dispatchEvent(new customEvent(eventName, props);
Handle event: There are two ways to listen to an event.
- Declaratively from the component’s HTML template:
<template>
<c-child-component oneventName={listenerHandler}></c-child-component>
</template>
- Programmatically using an imperative JavaScript API:
this.template.addEventListener(‘eventName’, this.handleNotification.bind(this));
It’s better to listen from the HTML template since it reduces the amount of code we need to write. To handle events, define methods in the component’s JavaScript class.
Let’s see one example of Declarative via html markup:
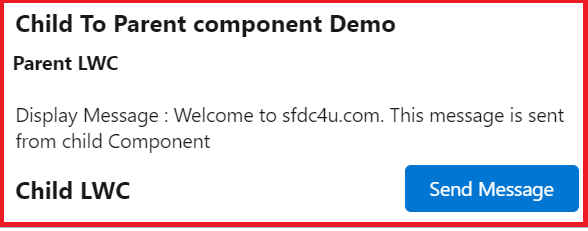
In this example, the child component will be sending a message to the parent component.
Step1> Create a lwc component and name it as childLwc and add the following code:
childLwc.html
<template>

    <lightning-card title="Child LWC">

        <lightning-button variant="brand" label="Send Message" title="Send Message" slot = "actions" onclick={childHandler}></lightning-button>

    </lightning-card>

</template>
Step 2) Create a custom event in the js class by providing the name along with passing data in the event.
ChildLwc.js
/*

* @description: child component- child to parent demo

* @author: sfdc4u.com

*/

import {LightningElement} from 'lwc';

export default class ChildLwc extends LightningElement {

    childHandler() {

        const evt = new CustomEvent('sendmessage', {detail: "Welcome to sfdc4u.com. This message is sent from child Component"});

        this.dispatchEvent(evt);

    }

}
At Line 15 in the above Javascript code, we are creating a custom event by providing the name along with passing data in the event.
At Line 17 we are dispatching the event.
this.dispatchEvent(evt);
Step 3> Create a component(LWC) named as parentLwc and insert the following code:
<template>

    <lightning-card title="Child To Parent component Demo">

        <div style="font-weight:bold;margin-left:10px">Parent LWC</div> <br/>

        <p class="slds-p-horizontal_small">

            Display Message : {message}

        </p>


        <c-child-lwc onsendmessage={parentHandler}></c-child-lwc>

    </lightning-card>

</template>
In the above HTML code at Line 14, we have added the handler – onsendmessage={parentHandler}. Whenever the child component dispatches the custom event sendmessage, the parent would be handling it.
Step 4> Add the js class with the following code:
ParentLwc.js
/*

* @description: parent component- child to parent demo

* @author: sfdc4u.com

*/

import { LightningElement } from 'lwc';

export default class ParentLwc extends LightningElement {

    message;

    parentHandler(event) {

        this.message = event.detail;

    }

}
Step 5> Update your meta.js file to make this component available for App, home page.
<?xml version="1.0"?>

<LightningComponentBundle xmlns="http://soap.sforce.com/2006/04/metadata">

    <apiVersion>55.0</apiVersion>

    <isExposed>true</isExposed>

    <targets>

        <target>lightning__RecordPage</target>

        <target>lightning__AppPage</target>

        <target>lightning__HomePage</target>

    </targets>

</LightningComponentBundle>
Output:
3.> Pub- Sub model in LWC
In this section, we will learn about the Publish-Subscribe Model in LWC (also known as pubsub model in LWC) to make communication between two independent components.
Publish-Subscribe (pubsub) Model in LWC is used to make communication between two independent components.
Note: Publish-Subscribe Model only works for components that are on the same page.
Pubsub model support below three method:
- Register
- UnRegister
- Fire
Steps to Implement pub-sub
Step 1> Create pubSub component .
pubSub.html
<template>
</template>
pubSub.js
Note: If there are any ‘&&’ in the below code, replace it with ‘&&’.
/**
 * A simple publish-subscribe utility for Sibling component communication.
 */

const events = {};

const samePageRef = (pageRef1, pageRef2) => {
    const obj1 = pageRef1.attributes;
    const obj2 = pageRef2.attributes;
    return Object.keys(obj1)
        .concat(Object.keys(obj2))
        .every(key => {
            return obj1[key] === obj2[key];
        });
};

/**
 * Registers a callback for an event
 * @param {string} eventName - Name of the event to listen for.
 * @param {function} callback - Function to invoke when said event is fired.
 * @param {object} thisArg - The value to be passed as the this parameter to the callback function is bound.
 */
const registerListener = (eventName, callback, thisArg) => {
    // Checking that the listener has a pageRef property. We rely on that property for filtering purpose in fireEvent()
    if (!thisArg.pageRef) {
        throw new Error(
            'pubsub listeners need a "@wire(CurrentPageReference) pageRef" property'
        );
    }

    if (!events[eventName]) {
        events[eventName] = [];
    }
    const duplicate = events[eventName].find(listener => {
        return listener.callback === callback && listener.thisArg === thisArg;
    });
    if (!duplicate) {
        events[eventName].push({ callback, thisArg });
    }
};

/**
 * Unregisters a callback for an event
 * @param {string} eventName - Name of the event to unregister from.
 * @param {function} callback - Function to unregister.
 * @param {object} thisArg - The value to be passed as the this parameter to the callback function is bound.
 */
const unregisterListener = (eventName, callback, thisArg) => {
    if (events[eventName]) {
        events[eventName] = events[eventName].filter(
            listener =>
                listener.callback !== callback || listener.thisArg !== thisArg
        );
    }
};

/**
 * Unregisters all event listeners bound to an object.
 * @param {object} thisArg - All the callbacks bound to this object will be removed.
 */
const unregisterAllListeners = thisArg => {
    Object.keys(events).forEach(eventName => {
        events[eventName] = events[eventName].filter(
            listener => listener.thisArg !== thisArg
        );
    });
};

/**
 * Fires an event to listeners.
 * @param {object} pageRef - Reference of the page that represents the event scope.
 * @param {string} eventName - Name of the event to fire.
 * @param {*} payload - Payload of the event to fire.
 */
const fireEvent = (pageRef, eventName, payload) => {
    if (events[eventName]) {
        const listeners = events[eventName];
        listeners.forEach(listener => {
            if (samePageRef(pageRef, listener.thisArg.pageRef)) {
                try {
                    listener.callback.call(listener.thisArg, payload);
                } catch (error) {
                    // fail silently
                }
            }
        });
    }
};

export {
    registerListener,
    unregisterListener,
    unregisterAllListeners,
    fireEvent
};
Code ref: https://github.com/trailheadapps/lwc-recipes/tree/main/force-app/main/default/lwc/pubsub
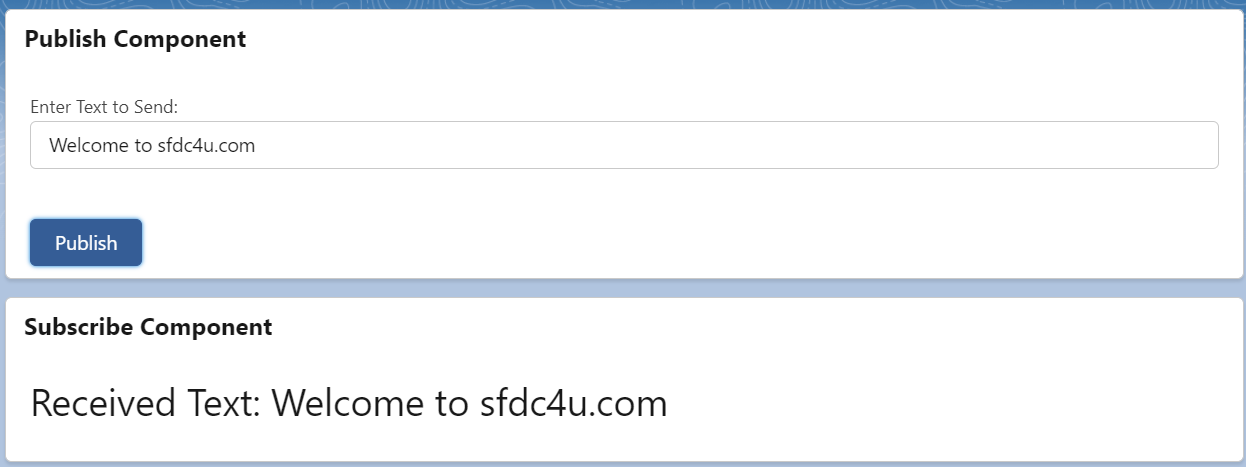
Step 2> Create a publishComponent with a text box and a button. Use onclick and onchange event on button and text box respectively to get the text value in strText in the JS controller once the button is clicked.
publishComponent.html
<template>
    <lightning-card title="Publish Component">

        <lightning-input class="slds-p-around_medium" label="Enter Text to Send: " value={strText}
            onchange={changeName}></lightning-input>
        <br/>
        <lightning-button class="slds-p-around_medium" label="Publish" variant="brand"
            onclick={publishEvent}></lightning-button>

    </lightning-card>
</template>
Step 3> In the JS controller we need to import pubsub code. Once the publish button is clicked, publishEvent() will be called that will fire the event. We need to pass page reference, event name, and payload to fireEvent().
publishComponent.js
import { LightningElement, wire } from 'lwc';
import { fireEvent } from 'c/pubsub';
import { CurrentPageReference } from 'lightning/navigation';

export default class PublishComponent extends LightningElement {
    strText = '';
    @wire(CurrentPageReference) objpageReference;

    changeName(event){
        this.strText = event.target.value;
    }

    // This method will fire the event and pass strText as a payload.
    publishEvent(){
        fireEvent(this.objpageReference, 'sendNameEvent', this.strText);
    }
}
Step 4> subscribeComponent has code to display the received text.
subscribeComponent.html
<template>

    <lightning-card  title="Subscribe Component">
        <p class="slds-p-around_medium" style="font-size:25px">
            Received Text: {strCapturedText}
        </p>
    </lightning-card>

</template>
Step 5> In JS controller, we have to import modules mentioned in pubSub. We should register the listener in connectedCallback(). This method executes when the component is rendered on DOM. We have to pass event name, callback method, and “this” reference to registerListener().
Callback method setCaptureText() will run once the event is captured and assign the payload value to strCapturedText. The same will be reflected in UI.
We will un-register the listener in disconnectedCallback() as it will run once the component is removed from the DOM. As we have only one event in this demonstration, unregisterAllListeners(this) is being used to un-register the events.
subscribeComponent.js
import { LightningElement, wire } from 'lwc';
import { CurrentPageReference } from 'lightning/navigation';
import { registerListener, unregisterAllListeners } from 'c/pubsub';

export default class SubscribeComponent extends LightningElement {
    strCapturedText = '';
    @wire(CurrentPageReference) pageRef;

    // This method will run once the component is rendered on DOM and will add the listener.
    connectedCallback(){
        registerListener('sendNameEvent', this.setCaptureText, this);
    }

    // This method will run once the component is removed from DOM.
    disconnectedCallback(){
        unregisterAllListeners(this);
    }

    // This method will update the value once event is captured.
    setCaptureText(objPayload){
        this.strCapturedText = objPayload;
    }

}
Output:
Reference: Events in LWC
Also read: Best Practices in Lightning Web Component
2 thoughts on “Chapter 8: Events in Lightning Web Component”